
Übersicht: Tipps, Tricks und Tutorials im Vektorgarten
Align and Distribute - Special
Deutsche Fassung: Anordnen und verteilen - Spezial
How to align objects like this?

Or like this?

You get the point: No object is clipped and together they form something bigger. The examples contain only few objects, so you could build it manually in both cases if needed, that is selecting the redundant objects one by one and deleting them. But we don't want that. I'll show you a workflow that is stable for even more objects.
Step 1: The pattern
The underlying pattern is made with a pattern fill in one case, with sprayed symbols in the other. It's very important that you don't get distracted by effects (the 3D-ball-look respectively the outline). All this will be applied at the end. Start with simple filled objects.
Expand the pattern fill or release the instances of the symbols. You also have to ungroup the objects if needed (see the layer panel for details). When you only have single objects left on the artboard, combine them into a compound path.


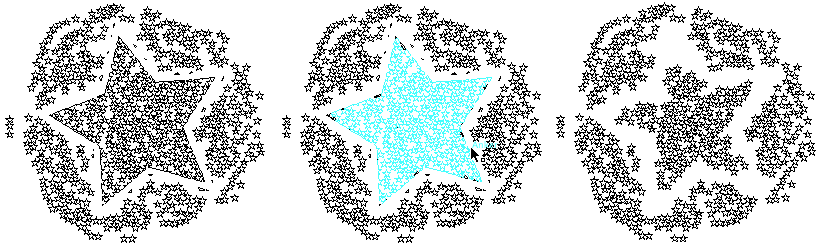
Step 2: The cutting die
In both cases you will work according to Michelangelo „Everything that doesn't look like lion, I cut away with my chisel“. The task is to make a form you can use to automatially cut away objects you don't need. Since we want to use the pathfinder later on we will need fills - the majority of pathfinders works (best) with filled objects.


On the left additionally to the city's outline (this is the city of Hamburg btw) you have to construct a rectangle that enfolds all objects. The star on the right is made with the star tool. Apply a stroke of the desired width and outline the stroke using Objects > path > outline stroke.

The city's outline and the rectangle are combined into a compound path.

The "dots" and the "outline-rectangle" are applied the same fill color and no stroke.
Step 3: Punching
In each case select both compound paths and apply the pathfinder "Merge" (below row, third from the left)

You won't see any change in preview mode, but in outline mode:


Step 4: Cleaning up
For this step it's crucial to keep an eye on the layer panel and to ungroup things just in time. The pathfinder result is grouped - you have to release it. After that you can delete the big green area - this works best in preview mode.

The green area is gone (see right) - in preview mode it looks fine. But the file is far from correct, you will notice that after changing into outline view again:

You can analyze exactly which objects are stacked here when activating smart guides (middle) and moving the cursor over the paths. Looks like everything is still double. On the right you see what it looks like when the ”border” is moved. So you have to select the ”border“ (and all the objects connected with it) and delete them as well.
With the other objects it looks like this:
Only after the second delete the object is “clean“.
Step 5: Dressing up
At the end you apply the final appearances to the objects. A simple radial gradient creates the “pinpoint-look“.
Alternatives
As an alternative for the regular alignment of dots, you could first convert the shape to pixels, then apply Object > Object mosaic. After that Effect > Convert to shape > Ellipse.
An irregular alignment of circles can be achieved with the script CircleFill. Scripting on this website
How to set up a file: vector/raster, color mode, resolution, file format
Mysterious things Illustrator does - Saving files (Video on Vimeo)
EPS – the zombie of file formats
Saving safely
Saving legacy files
Long Shadows with Illustrator
Problems with align to pixel grid
Proposals for better better workflow in Illustrator
3D-Animation
Freeform-artbrush with a gradient
Pathfinder doesn‘t react
Stylish guilloches with gradients
Outline object and outline stroke
© Monika Gause, 2009/2017 . Impressum/Datenschutz . Grafik . mediawerk